Though you may have never stepped through the doors of a Makerspace, Hackerspace, or Fab Lab, the Maker Movement is still all around you. Think about it, how many DIY or Lifehack videos do you see circulating around the internet on a daily basis? We are in a very hands-on age where so many of us live for that sense of satisfaction that only comes from creating something with your own two hands. There are still some of us, however, who don’t feel like we have the skills necessary to participate in the DIY culture. You’re no artist or woodworker- so what place do you have in Maker Culture? You may be surprised to hear that there are a lot of really simple DIY projects out there that virtually anyone can do:

1) Build a bookshelf with ladders and wood
Would you believe that all you need to create your very own bookshelf is two ladders and planks of wood? Step one, buy two ladders. Step two, buy planks of wood that are thin enough to fit within the steps of the ladder and long enough to reach them both when they’re opened. Make sure you measure before you buy the wood. Step three, place the planks of wood within the ladder steps. Now you’ve got a new place to display your books. Extra points if you paint the ladders or wood!

2) Sharpie Mug
Have you seen those adorable customized mugs all over Etsy? Well, it’s really easy to make one of your own. All you need is a coffee cup, a sharpie, and an oven- that’s it. Simply take the sharpie and write or draw whatever you want on your cup. Once whatever you wrote or drew on the mug is dry, pop the mug in the oven and bake for 30 minutes at 350 degrees Fahrenheit. Viola! You now have your own customized mug (and maybe even the beginnings of your own Etsy shop, too).
3) Color Your Keys
Do you spend a good five minutes at your front door, struggling to hold all of your belongings as you flip through your various keys? Rather than buy key covers, try this simple DIY project to help. Simply take nail polish in various colors and paint a different color on the head of each key. That’s it. Much easier to find the one purple key than one of the ten silver keys you have.
4) Bathroom Basket
If you want a cute storage bin to display your various soaps and candles, but don’t want to spend money on a wicker basket, there’s a very easy and inexpensive way to make your own. Simply take a cardboard box and a piece of frayed, rustic rope. Using a hot glue gun, glue the rope along the bottom edge of the box. Continue to spin the rope around and glue, working your way up to the top of the box. Once you reach the top, snip off the end of the rope and make sure the pieces are secure. Next, take an old white tank top and cut at the halfway mark. Glue the top two halves together, then fold them over the top of the basket. Now you have a rustic bin for all of your bathroom display needs. Check out the video below to see the steps in more detail:
5) Imprint a photo onto wood
To display a photo with a more rustic feel here’s a super easy way to imprint a photo onto wood. Simply cover the wood with gel medium and place the paper photo face down on its surface. Smooth our all the bubbles firmly and let it dry overnight. In the morning, dab the photo with a wet cloth and gently rub the wetted paper residue off. Cover with Mod Podge and let it dry. And now you’ve got a rustic wooden photo to display however you’d like!
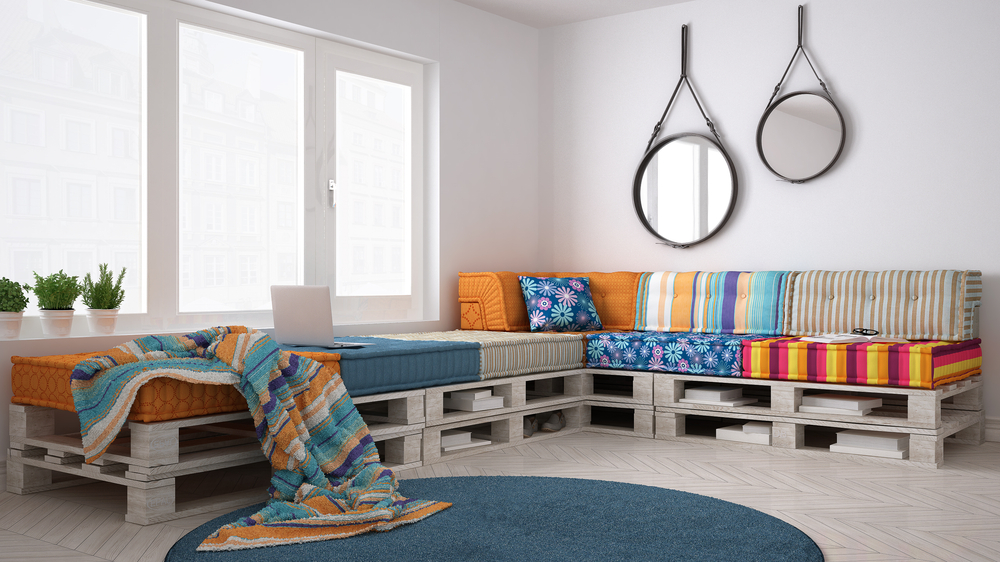
6) Wooden Pallets to Couch
This one may sound beyond your capabilities, but we promise it’s super easy. Simply start by taking some old wooden pallets and painting them with white paint. Then you stack them strategically in a corner of your house and place cushions on top. Suddenly you have a super cute couch and some storage space to boot!
7) Blanket Ladder
Supplies:
– 16 feet of wood and 8-foot furring strips
-Eight (2 and 1/2 inch) wood screws.
-Wood glue
-Stain (Minwax in Dark Walnut)
-Saw (if you don’t own a chop saw you could easily do this project by hand with a hacksaw)
First, cut one 5-foot piece of wood from each of your 8-foot pieces, so you have two five foot pieces. Then cut four 18 inch pieces of wood from the remaining wood. Lay them out on the ground to make a ladder. Put them 12 inches apart and measure 18 inches from the ground and leave 6 inches at the top so that you can hang the blanket from the bottom bar. Dab a little bit of wood glue on the end of each bar then attach with a screw from the outside of each side piece going straight into the center of the end of each bar. Stain it the color of your choice and let it dry and air out completely.